
मान लो आपने एक photo click की।
Face अच्छा आ रहा है। Pose भी ठीक है। लेकिन फिर भी photo में वो Instagram वाला premium feel नहीं आ रहा।
Background थोड़ा boring है। Lighting भी normal है। और पूरी photo देखकर लगता है — “ठीक है, लेकिन कुछ missing है।”
पहले ऐसी photo को अच्छा बनाने के लिए Photoshop या Lightroom जैसे tools सीखने पड़ते थे। या फिर किसी editor से काम करवाना पड़ता था।
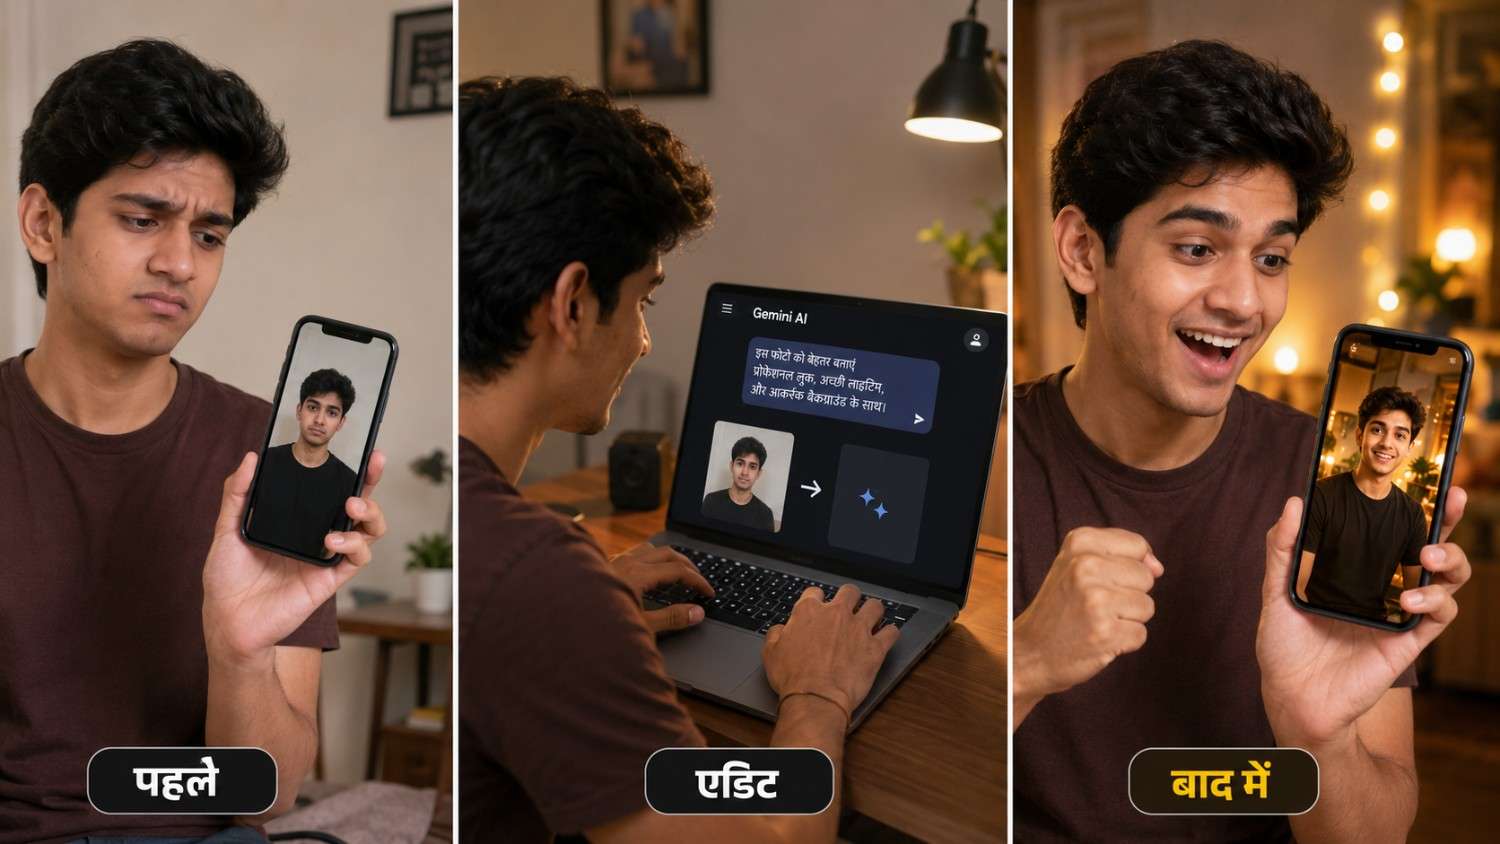
लेकिन अब चीजें थोड़ी आसान हो गई हैं।
अब Gemini AI की मदद से आप अपनी normal photo को stylish, cinematic और social media-ready बना सकते हो।
Table of Contents
Gemini AI Photo Editing कैसे काम करता है?
अब आपके मन में सवाल आ सकता है — Gemini photo को समझता कैसे है?
मान लो आपने अपनी एक simple selfie upload की।
आप normal T-shirt में खड़े हो। पीछे घर की wall है। Lighting भी average है।
अब आप Gemini को prompt देते हो:
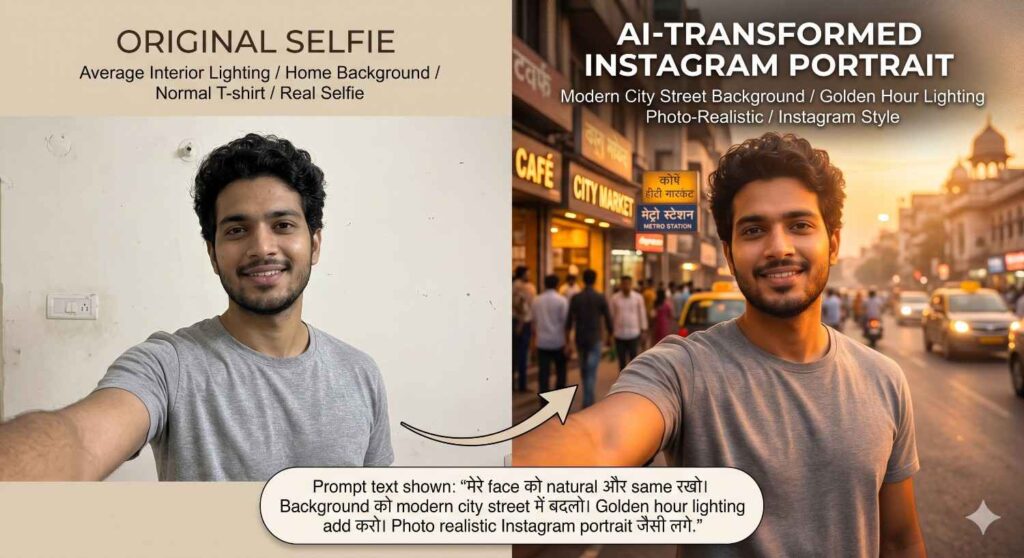
“मेरे face को natural और same रखो। Background को modern city street में बदलो। Golden hour lighting add करो। Photo realistic Instagram portrait जैसी लगे.”
Gemini आपकी photo में subject, face, background, lighting और style को समझकर नया edited version बनाने की कोशिश करता है।
यानी काम बहुत simple है:
आप photo देते हो।
आप instruction देते हो।
Gemini image edit करता है।
Gemini AI Photo Editing की Main Features
1. Background Change
कई बार photo अच्छी होती है, लेकिन background खराब होता है।
मान लो आपकी photo में face अच्छा आ रहा है, लेकिन पीछे messy room दिख रहा है।
ऐसे में आप Gemini से background change करवा सकते हो।
Prompt example:
“इस photo का background modern cafe जैसा कर दो। Face natural रखना और lighting warm रखो.”
2. Lighting Improve करना
कई बार photo खराब नहीं होती, बस lighting weak होती है।
Face dull दिखता है। Colors flat लगते हैं। Photo में depth नहीं आती।
Gemini से आप photo में soft light, golden hour look या cinematic lighting add कर सकते हो।
Prompt example:
“इस photo की lighting soft और cinematic कर दो। Skin tone natural रहे और photo over-edited न लगे.”
3. Outfit Style Change
अगर आपकी photo अच्छी है लेकिन outfit थोड़ा simple लग रहा है, तो Gemini से outfit style change करवाया जा सकता है।
Prompt example:
“Face same रखो। Outfit को stylish black jacket जैसा बनाओ और background urban street रखो.”
यह Instagram portrait, creator profile और fashion-style edits के लिए useful है।
लेकिन ध्यान रखना।
अगर आप चाहते हो कि face same रहे, तो prompt में ये line जरूर डालो:
“Face और identity original जैसी रखना.”
4. Cinematic Portrait Look
आजकल Instagram पर cinematic portraits बहुत चल रहे हैं।
Soft background blur, warm lighting, DSLR look और stylish pose — ऐसी images काफी attractive लगती हैं।
Gemini से आप अपनी normal photo को cinematic look दे सकते हो।
Prompt example:
“इस photo को cinematic portrait look दो। Background हल्का blur हो, golden hour lighting हो और photo realistic DSLR camera जैसी लगे.”
5. Product Photo Editing
अगर आप small business करते हो या blog पर product-related content डालते हो, तो Gemini product photos में भी help कर सकता है।
मान लो आपके पास perfume bottle, gadget, book या कोई छोटा product है।
आप Gemini से उसे professional background में दिखा सकते हो।
Prompt example:
“इस product photo को clean white background पर रखो। Soft shadow add करो और professional e-commerce look दो.”
यह छोटे sellers, bloggers और creators के लिए काफी काम की चीज है।
Gemini AI से Photo Edit कैसे करें? Step-by-Step Guide
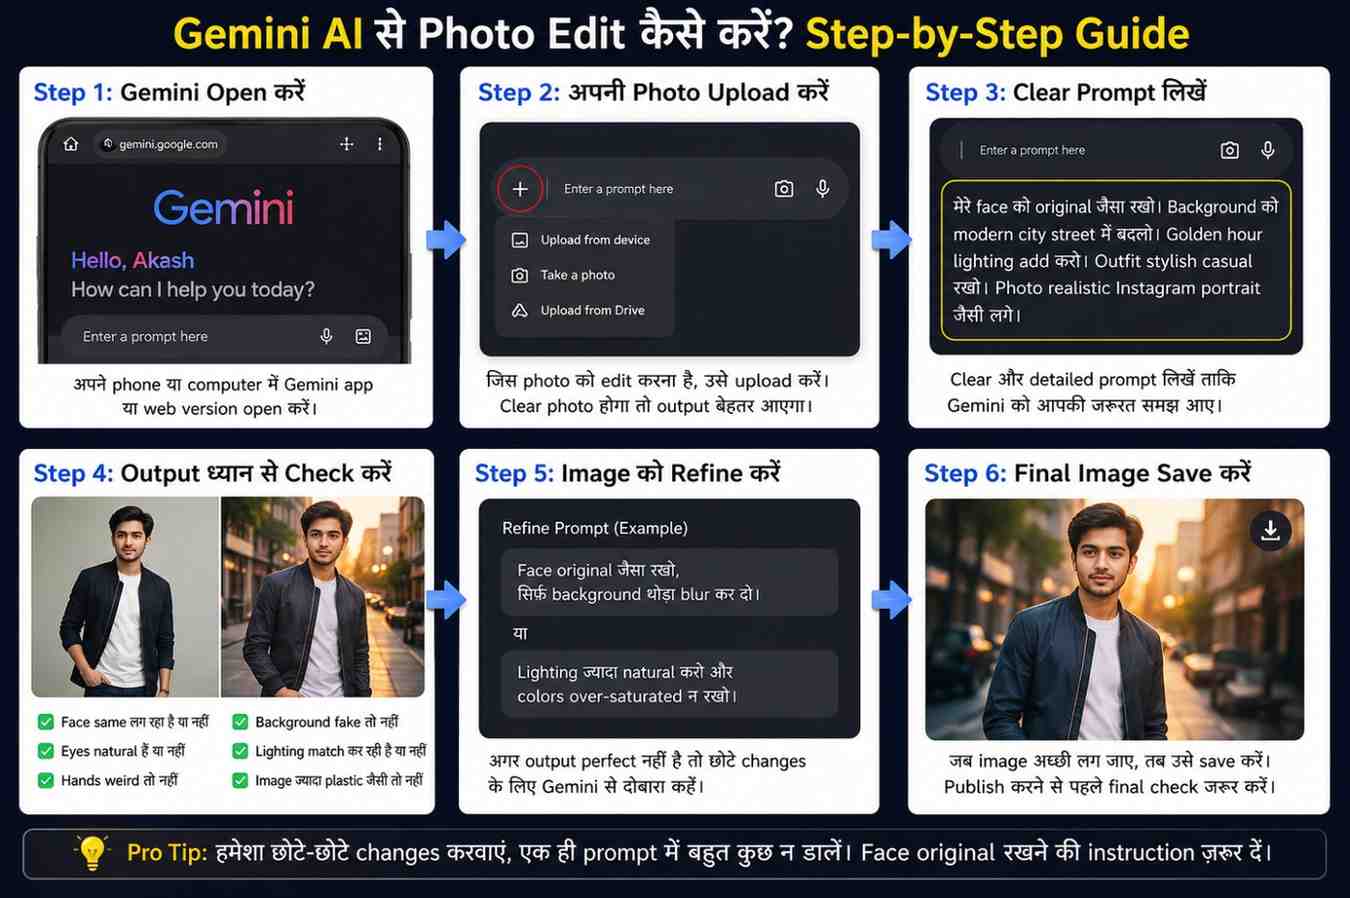
Step 1: Gemini Open करें
सबसे पहले अपने phone या computer में Gemini open करें।
आप Gemini app use कर सकते हो या web version open कर सकते हो।
Interface थोड़ा बदल सकता है, लेकिन process लगभग same रहेगा।
Step 2: अपनी Photo Upload करें
अब जिस photo को edit करना है, उसे upload करें।
यहाँ मेरी एक simple advice है।
Original photo जितनी clear होगी, output उतना अच्छा आएगा।
अगर photo बहुत blur है, dark है या face साफ नहीं दिख रहा, तो AI भी perfect result नहीं दे पाएगा।
तो कोशिश करें कि photo में face clear हो, lighting ठीक हो और image बहुत low-quality न हो।
Step 3: Clear Prompt लिखें
यहीं असली काम शुरू होता है।
Weak prompt:
“Edit this photo.”
यह prompt बहुत साधारण है।
Gemini को कैसे पता चलेगा कि आपको क्या चाहिए?
Better prompt:
“मेरे face को original जैसा रखो। Background को modern city street में बदलो। Golden hour lighting add करो। Outfit stylish casual रखो। Photo realistic Instagram portrait जैसी लगे.”
देखा?
इस prompt में Gemini को साफ direction मिल रहा है।
Step 4: Output ध्यान से Check करें
Image generate होने के बाद उसे जल्दी में use मत करो।
Face same लग रहा है या नहीं।
Eyes natural हैं या नहीं।
Hands weird तो नहीं दिख रहे।
Background fake तो नहीं लग रहा।
Lighting face के साथ match कर रही है या नहीं।
Image ज्यादा plastic जैसी तो नहीं लग रही।
थोड़ा zoom करके देखो।
यही point लोग ignore कर देते हैं।
AI image पहली नजर में अच्छी लग सकती है, लेकिन details में mistake हो सकती है।
Step 5: Image को Refine करें
अगर output perfect नहीं आया, तो परेशान होने की जरूरत नहीं है।
आप Gemini से छोटे changes करवा सकते हो।
Example:
“Face original जैसा रखो, सिर्फ background थोड़ा blur कर दो.”
या
“Lighting ज्यादा natural करो और colors over-saturated न रखो.”
Step 6: Final Image Save करें
जब image अच्छी लग जाए, तब उसे save करें।
लेकिन publish करने से पहले final check जरूर करें।
Gemini AI Photo Editing कहाँ-कहाँ काम आ सकता है?
1. Instagram Photos
अगर आप Instagram पर अच्छी photos डालना चाहते हो, तो Gemini से normal photos को stylish बनाया जा सकता है।
2. YouTube Thumbnail
YouTube thumbnail में face, expression और background बहुत matter करते हैं।
अगर thumbnail dull है, तो लोग click नहीं करते।
Prompt example:
“इस photo को YouTube thumbnail style में edit करो। Face expressive रखो और background में AI editing tools का creative setup दिखाओ.”
3. Blog Feature Image
अगर आप मेरे जैसे blog चलाते हो, तो article के लिए feature image बनाना बहुत जरूरी होता है।
हर article में एक attractive image चाहिए।
Gemini से आप topic के हिसाब से image बना सकते हो।
4. Profile Picture
LinkedIn, Instagram या WhatsApp DP के लिए clean profile photo चाहिए होती है।
Gemini इसमें भी help कर सकता है।
Prompt example:
“इस photo को professional profile picture बनाओ। Background clean हो, lighting soft हो और face natural लगे.”
5. Product Photos
Small business owners के लिए product photo बहुत important होती है।
अगर product अच्छा है लेकिन photo खराब है, तो customer interest कम हो सकता है।
Prompt example:
“इस perfume bottle को premium product photo जैसा बनाओ। Black background, soft reflection और luxury lighting add करो.”
my Tips: Better Output कैसे लें?
Tip 1: Prompt Formula याद रखो
एक simple formula use करो:
Subject + Change + Background + Lighting + Style + Quality
Example:
“मेरे portrait को edit करो। Face same रखो। Background modern office बनाओ। Soft studio lighting add करो। Realistic professional look दो। High-quality DSLR photo style रखो.”
Tip 2: “Realistic” Word जरूर Add करो
AI कई बार image को ज्यादा artificial बना देता है।
इसलिए prompt में लिखो:
“Realistic photo style, natural skin texture, no over-editing.”
Tip 3: पहले Background, फिर Lighting
मेरा best workflow यह है:
पहले background change करो।
फिर lighting improve करो।
फिर outfit या style change करो।
आखिर में final color correction करो।
इससे output ज्यादा clean आता है।
Tip 4: Output को Blindly Use मत करो
AI image अच्छी लग रही है, इसका मतलब यह नहीं कि वह perfect है।
Zoom करके check करो।
यही छोटी habit आपकी image quality को काफी better बना सकती है।
READ MORE:Prompt Engineering सीखें: AI से Better Output लेने का तरीका
Final Verdict
मैं बात को घुमा फिराकर नहीं कहूंगा।
Gemini AI Photo Editing beginners के लिए सच में काम का tool है।
अगर आप Instagram photos, YouTube thumbnails, blog feature images, profile pictures या product photos बनाना चाहते हो, तो यह आपकी editing speed बढ़ा सकता है।
लेकिन एक बात याद रखो।
Tool अच्छा होना काफी नहीं है।
Prompt अच्छा होना चाहिए।

नमस्ते दोस्तों, मैं आकाश हूँ, AI With Me का founder।
AI With Me एक technology blog है, जहाँ मैं Artificial Intelligence, AI tools, online earning ideas, digital marketing, blogging tips और latest tech updates को आसान भाषा में समझाने की कोशिश करता हूँ।
मेरा मकसद simple है — tech और AI से जुड़ी जानकारी को इतना आसान बनाना कि beginner भी उसे समझ सके और अपने काम, study, content creation या online growth में सही तरीके से use कर सके।